Last month, we discussed how the Kelvin rating (the “coolness” or “warmness”) effects our perception of art, as well as how it changes the feel of a room. Here in Part 2, we’re going to tackle two equally important topics – the distance & degree-coverage of the bulb, and dimmable circuits.
So let’s say your home is finished and you have no intentions of bringing in an electrician to add wiring to light your art. This means you’re going to use the existing fixtures, which are a set distance from the wall displaying your art. And for that distance, for the sake of this discussion, let’s say that the lights are 8′ from the art wall. When choosing a bulb, you’ll often notice that a bulb from any given manufacturer comes in 2 or 3 different degree spreads. For example, you’re looking at a 5-watt 4500K LED bulb by Brand X, and they offer that bulb as:
15-Degree Spot
40-Degree Mid-Flood
70-Degree Flood
How to choose??? Well, most of us are not going to reminisce back to 3rd-grade math class and pull out that trusty protractor that’s been sitting in the shoebox. But simply standing under the light fixture facing the art wall with your arms extended narrowly spread, moderately spread, and then spread wide, should start you in the right area. Given an extra week, I’d actually love for you to order one of each of those three degree-spread bulb choices and try them out, but I’ll bet few are going to take my recommendation there! Anyway, the goal is to gently highlight the art without lighting the rest of the area. So which degree-spread is right, since I said earlier that your fixture is 8′ away??? Well, that depends on the size of the art! In my example, I’ve hung a 60×40″ Flocean #9 on a VERY-rough-looking wall in the Gug Underwater pr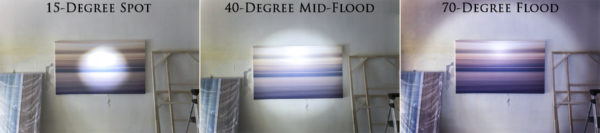 oduction warehouse.
oduction warehouse.In the first photo, I’ve simulated using a 15-degree spot. The result is a hot-spot in the middle of the art, and the edges look too dark. In the 2nd photo, I’ve simulated using a 40-degree mid-flood. That feels just right for this piece; the art is highlighted nicely, and the rest of the room is left lit, but not highlighted. I doubt if your home has chunks taken out of the wall like my production workspace, but notice how the highlight takes the eye towards the art, and away from things we don’t necessarily want to feature. And in the 3rd photo, I’ve simulated using a 70-degree flood. While this is better than the 15-degree spot, it highlights too wide of an area, and even in a tidy home, will probably draw the eye to some things we don’t necessarily care to feature. Notice how the “hot-spot” decreases in intensity, the more spread the degree-coverage is. That’s simply because if the bulb is, for example, a 5-Watt LED which produces 800 lumens, that 800 lumens is super-concentrated over just 10″ in the 15-degree spread, but diffused over 100″ in the 70-degree spread.

So, am I saying everyone should rush out and get 40-degree mid-flood bulbs? Of course not!!! What if your existing light fixture is only 2′ away from your art wall? In that case, the 70-degree flood would probably be just right! Likewise, if your lighting was all the way across the room, say 16′ from the art wall, then a 15 or 20-degree spot would spread out to just the right coverage, since it has such a far distance to cover. So with that 15-degree spot, if the art wall is just 2′ away, if might cast light perfectly on a small 10″ wide piece, but since we are using a 60×40″ piece, increasing the distance to 16′ keeps the degree-spread at 15-degrees, but increases the wall coverage to 50 or 60″, and highlights the art nicely. And here’s a nifty tip when there’s multiple bulbs: the left bulb doesn’t necessarily have to light the left side of the art! Try crossing the beams – this puts more distance between each bulb and the art, making the beam spread out more.
As I said earlier, in those examples, our light fixtures are already there and I’m assuming you don’t want to hire an electrician to add a fixture. But for those who are currently in the remodeling phase, this is an excellent discussion to be having with your GC or electrical contractor, and the earlier you discuss it, the easier and less expensive it will be! There’s no one-size-fits-all distance for where to put the fixtures, but if I was pressed into giving a general blanket recommendation, I’d tell people that they should install one fixture for every 3′ of art, at a distance of 3′ from the wall (meaning that an 8’x3′ piece of art should have 3 bulbs dedicated to it, just slightly overlapping in coverage). One super-easy fix that works for many modern homes applies to those with down-lighting cans built into the ceiling. It is quite easy indeed to replace a 3″, 4″ or 5″ down-lighting can with an equivalent “eyeball can” which converts from a down light to a pop-out rotating aim-able light. To keep the look consistent, most lighting manufacturers actually offer the same fixture in both a “down” version and an “eyeball” version. Bet your contractor forgot to offer that to you, right?!? So think of how easy it would be to take one or two of that room’s cans and replace it (often so simple you can DIY) with an aim-able eyeball can! If you’re remodeling soon, I’d recommend you use ONLY eyeball lights throughout the room – since eyeballs can be pushed back into the ceiling and become down-lights, you then have consistency in your fixtures, but can use some to down-light the room, and some to highlight your wall art! And in this case, there’s nothing wrong with using the same Kelvin bulb in 70-degree floods for the downward aimed cans, and 40-degree mid-floods for the ones aimed at the art walls. 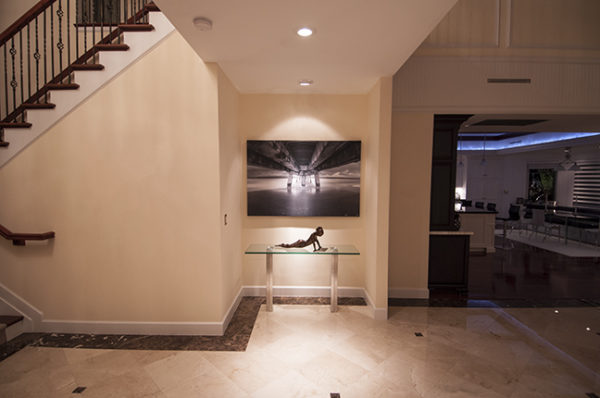
Now onto the topic of dimmers…. First off, if you’re remodeling, just do it in every room – easy as that! It’s obviously so much better to do it now than add it on later. And it shouldn’t really cost any more than a non-dimmable circuit, so why wouldn’t you? Even if you decided you didn’t want a dimmable room, generally if you put non-dimmable bulbs on a dimmable circuit, they’ll just default to full-power. So I can’t think of any reason to not have dimmable circuits installed while remodeling. Even if not for art, in my personal/work life, I keep HIGHLY irregular hours, but Suzanne keeps it “normal” and want’s a dark house from 11pm-7am, so when I’m coming in from a midnight backyard shore dive at 3am, those dimmers allow me to creep through the house without her waking up and strangling me! But I digress….all I’m saying is that I feel it’s a no-brainer. Want to highlight the art during the day when the window light is strong? You’ll need full power. Having a dinner party and wanting to have soft lighting but still highlight your new 10′ wide Gug centerpiece….well that probably calls for those art wall lights to be dimmed down to 25-30%. In an ideal world, which might be possible only during the design process, you’d have two separate dimmer circuits; one for the room’s down lighting, and another for the art wall lighting. And remember, double-check that all the components (circuits, wall-switches, bulbs, etc.) are all dimmable, or else the entire system will usually just work as on/off on full-power.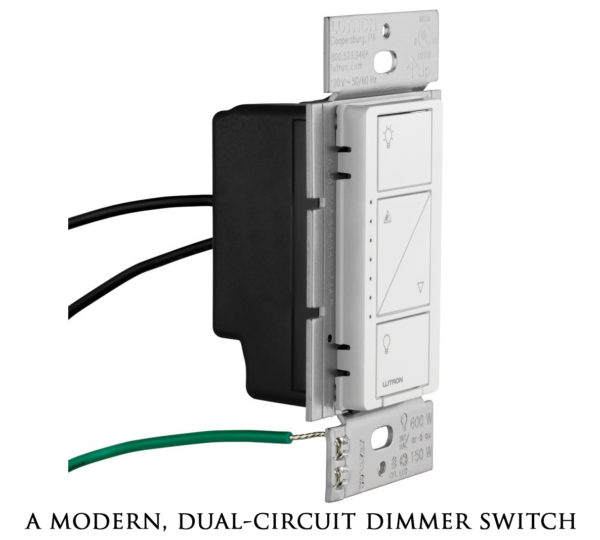
I know to some, all this sounds absolutely overwhelming, but really, if you’re in the process of working with a GC or electrical contractor, that’s child’s play for them to make it happen for you, and if you’re going to invest in one of our larger centerpieces as a real statement in the room, just a little planning (and probably just barely any more expense, if any at all) can make the difference between what appears to be “something you bought to fill a space”, vs. an elegantly-designed statement piece that makes every guest gasp oooh’s and ahhhh’s. Even more importantly, it will make YOU have that same gasp every single day.
In conclusion, re-read “Part 1” which discussed the Kelvin scale of cool blue-white lighting vs. warmer, more yellow light. Then, based on your needs, determine the degree-spread that will highlight the art most effectively, to be determined in conjunction with the distance the fixture is from the art wall, which will determine how much of the art wall is lit. Don’t just click & buy the first bulb – put some real thought into it (particularly if you’ve chosen your Gug to be printed on aluminum, which is more light-reactive than canvas), and try a one of a few different types before investing in the 15 or so bulbs necessary to light that living room. And always remember – there’s rarely one perfect answer – true, there some guidelines and starting points, but in the end, most of it is personal preference. You can always email us some photos of your room (or builder’s plans), or even schedule an appointment to do a FaceTime video-chat walkthrough of your home with one of our design staff, so we can offer an opinion on how to light your Gug. I know it’s a lot to take in…..breathe…..we’re here to help!