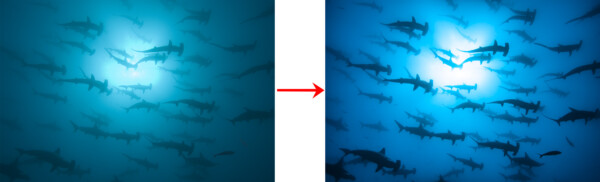
Since the dawn of my career, I’ve been touting passion over technology, effort over what camera to buy, and have responded to 10,000 inquiries of “what camera did you use“, with my snarky but true, “it’s not the camera – it’s what you do with it“. However,…. I’m also a tech-head, and have always tried to stay at the cutting edge with my tools. At the time of this writing, Adobe Photoshop is currently on v25.0, and I’m actually using the beta v25.1. That’s 16 full generations, since Photoshop CS2 when I first processed Hammerheads back in 2006. I’ve been using Photoshop since v3 back in ~1994, and it’s been amazing to watch how powerful each update is. I was curious to see if going through the same processing actions with today’s current photo processing technology could make any visual improvement on one of my old favorite images. My goal wasn’t to change the photo, or use AI to add or remove anything – I’m just trying to bring out the best possible quality with the most up-to-date technology, so my fine art prints look more like my original vision.
But admittedly, it’s not only the updated Photoshop that makes a difference. My tastes and style of working have changed over the years. Without being able to quantify how my artistic preferences have evolved, it stands to reason that I might simply like or dislike certain levels of contrast, sharpness, & detail. As an artist, these preferences might even change by the day according to my mood! Add to that, computer monitors have also come a long way, and what looked amazing to me 16 years ago on an Alienware laptop’s Ultrasharp monitor by Dell, might look very meh on my current calibrated NEC & ASUS monitors – both specifically designed for photographers and graphic artists.
Before we start on the how the file came out differently, it’s worth a quick explanation of what a RAW file is. We’re all familiar with .jpg – that’s the file format that most of our cameras, including phones, use to create an image. Apple does us a huge injustice by making their default format a proprietary .heic format, in order to force us to purchase a mac if we want to see photos shot on our iPhone, and makes it horribly difficult, if not impossible to view those photos on an Android device or a Windows computer. That’s a huge pet peeve of mine, and I always show my photo workshop students how to change it back to .jpg so they don’t fall into Apple’s marketing trap – but that’s a conversation for another day. But a RAW file is very different from a .jpg. Back when Nikon and Canon first came out with RAW files in ~2003, I read a 300-page book explaining the new format, so don’t expect me to explain it all here. But in a nutshell, there’s a few HUGE reasons why RAW is always my format of choice.
- Bit Depth. A .jpg is produced in 8-bit depth, whereas a RAW file is anywhere from 10 to 16-bit depth, depending on the camera and settings used. Quick simplified math: Red, green, blue – each with 8 bits of color data. So 3^8 number of color combinations each = 16.7 million colors. But 3^16 = 281 trillion color combinations. 16-bit color capture in today’s RAW files clearly produces a more accurate, and more editable file.
- A .jpg is a finished photo, with white balance, contrast, sharpening, saturation, etc. all applied in the camera manufacture’s algorithm. By contrast, think of a RAW file as simply a capture of light. Once captured by the camera, a 2nd step is mandatory back on the computer, where you must go through the time-consuming steps to apply all those settings in post-processing, using a program such as Adobe Camera RAW (which comes free with Photoshop). In Camera RAW, you choose all those settings, and until you do, the photo looks very flat and blah. It’s a lot more work-intense for the photographer, but you get total control, whereas with a .jpg, the camera is doing all the thinking for you. Convenience is nice, but it’s the opposite of creativity.
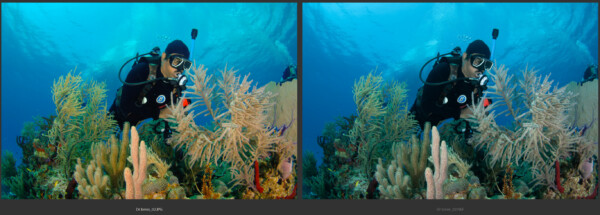
A photo of famed underwater archaeologist Dr. Jose Jones that I shot back in 2008 with simultaneous .jpg and RAW. Notice how the .jpg (left) has white balance, contrast, saturation, etc. already applied, while the RAW file (right) looks flat as it awaits those settings to be applied manually - It’s a lossless, non-destructive format. This is a complex topic which requires math, but think of it like this – every time you open, work on, and save a .jpg, you’re destroying a little bit of quality.
The reasons go on and on, but suffice to say, all my photos since ~2003 have been shot as RAW files. And this includes Hammerheads, shot on the 12MP Nikon D2X – Nikon’s cutting-edge flagship model at the time. So when I shot these beautiful sharks in Cocos Island, Costa Rica, at least I was already accustomed to working with RAW files. I’ve re-worked .jpg and .tif files from before 2003, and the results were less than optimal. Had the Hammerheads image been shot pre-RAW, I likely never would have bothered with this. Interesting side note – the new standard in professional video is 12-bit RAW video, wherein many of the same topics apply. The RAW video footage looks flat & blah, but during the labor and computer processor-intensive work, you have a much greater editing latitude. For a deeper understanding of RAW vs .jpg, check out how Nikon explains it in this article.
Over the years, Adobe’s engineers have tweaked their Camera Raw tech in ways that are simply too complicated for most of us to understand. So one of my first steps in this process was to look at the original 2006 RAW file, with its associated sidecar file, which is saved right alongside the RAW file. Once I click on the little “!” icon in Camera Raw’s interface, it updates the 2006 settings & sliders into the equivalent 2023 settings, but that usually makes barely any visual difference. Now I’m ready to play with the sliders.
I like to work with in the Camera Raw Interface from top to bottom, so first I start with the White Balance function to make sure the color of the water is a combination of the reality that my eyes saw, and a color tone that I feel makes a stunning fine art print for my clients. As I tweak the Temperature & Tint, I quickly realized the new technology was able to change the milky aqua into an electric blue. But I have to ask myself, how much of this is a function of the technology, and how much of this is simply an evolution of my personal tastes? The only way to know for sure would be to have Photoshop CS2 still loaded on my computer. Nope. I’m happy to move forward and forget about the limitations of the past, so I usually keep just the one previous version of Photoshop on my computer, in case there’s a bug and have to revert.
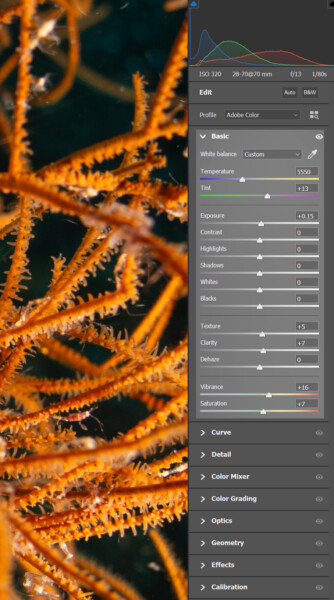
Next down the column, is Exposure and Shadows & Highlights. Exposure was barely tweaked, and knowing the state of digital cameras back then in 2006, one of the major limitations was super-high contrast situations where there’s very dark tones next to extremely bright tones. In my world of underwater photography, using a wide-angle lens and shooting up straight up into the sun creates exactly that problem. Unfortunately, it’s how I like to shoot, and I honed that style over hundreds and hundreds (thousands?) of rolls of film. And for the first 10 years of digital, I constantly looked for ways to make my high-contrast sunballs come out like they did on my beloved old Fuji Provia 100 film. The difference with the new software was nice, but didn’t come from the sliders I expected. My first slider was Highlights, thinking that would magically tone down the sun. But alas, it muddied the sun, and gave it an uncomfortable gray cast. The real benefit surprisingly, came from a combination of minor increases in Exposure and Shadows – by raising both, and ignoring Highlights, it brought the contrast of the silhouetted sharks and bright sun right to my happy place.
Working down the column, a slight bump in Clarity paid massive dividends by helping the blacks contrast sharply with the water column. The Dehaze tool hadn’t yet been invented when I first shot & processed this photo, but I normally ignore it for my images, because of the way it adds an unnatural cast to my colors, which are mostly created by the light from my underwater strobes. But in Hammerheads, it’s an ambient-light-only photo, without strobes, so here, for the first time in years, a slight increase in Dehaze really added some pleasing “pop”. Once all this is done, I can open the image in Photoshop, and do any repeat any corrective work I did back in 2006, such as removing sensor spots, etc. The bad news is, this work must be done again from scratch. But the good news is the Spot Healing Brush tool in today’s Photoshop v25.1 is leaps & bounds better than the Clone Stamp tool in 2006’s Photoshop CS2. One unintended, but pleasing consequence of this labor, is that after careful scrutinization of the re-worked file, I’m now going to start offering Hammerheads as photo art up to 150″ wide in canvas or aluminum, instead of the previous maximum of 120′.
And that’s pretty much it! If you were looking for a “how do I use Adobe Camera RAW” tutorial, well, that requires an impossibly long answer to an unrealistically over-simplified question, but a good place to start is with Adobe’s own explanation, which you can find here. My photo is still the same photo as it always was, just….. better! I think of it as analogous to Star Wars being originally released in 1977, and then re-released in 1997 after being digitally remastered. The main difference is where Industrial Light & Magic added a few weird CGI scenes, I didn’t use any of the new AI technologies, because after all, I am a photographer, not a digital artist. Not that I’m opposed to AI in the world of imaging – far from it. And in the future, I’m sure I’ll be getting more and more into it. But my commitment is to always strive to create the best possible image in the camera, rather than in Photoshop or AI, and if & when I do start using AI, I’ll always be completely transparent & truthful about what part is a real photograph, and what part is computer-generated. But that’s a topic for another blog post – see you in the future!